3D Printing
IMPORTANT!
At the front of most manuals are the warnings for general use. For most devices, the risks are obvious: electric shock, don’t use near water, etc. For 3D Printers, the risks are more varied. Below is what was actually in one of the pages of the manual for one of our 3D Printers.
- Hazards and Warnings: The 3D printer has motorized and heated parts. When the printer is in operation always be aware of possible hazards.
- Electric Shock Hazard: Never open the electronics bay of the printer while the printer is powered on. Before removing the access door, always power down the printer and unplug the AC line cord.
- Burn Hazard: Never touch the extruder nozzle or heater block without first turning off the hot end and allowing it to completely cool down. The hot end can take up to twenty minutes to completely cool. Also, never touch recently extruded plastic. The plastic can stick to your skin and cause burns.
- Also beware of the heated bed which can reach high temperatures capable of causing burns.
- Fire Hazard: Never place flammable materials or liquids on or near the printer when powered on or in operation. Liquid acetone and vapors are extremely flammable.
- Pinch Hazard: When the printer is in operation, take care to never put your fingers in the moving parts, including the belts, pulleys or gears. Also, tie back long hair or clothing that can get caught in the moving parts of the printer.
- Static Charge: Make sure to ground yourself before touching the printer, especially the electronics.
- Electrostatic charges can damage electronic components. To ground yourself, touch a grounded source.
- Age Warning: For users under the age of 18, adult supervision is recommended. Beware of choking hazards around small children.
The General 3D Printing Process
1. Build or find your 3D model
Finding 3D Models
The format for 3D Print models is STL files. You can find them in a variety of places online. Here are a few.
https://3dwarehouse.sketchup.com
Building 3D Models
There is plenty of software that can be used build 3D models. They are called CAD software. Here are a few free options.
Note: Be sure the software you choose can Save/Export to STL files!
TinkerCAD https://www.tinkercad.com
Google Sketchup (with STL plugin) http://www.sketchup.com
FreeCAD http://www.freecadweb.org
Blender https://www.blender.org
MeshLab http://meshlab.sourceforge.net
Voxel http://voxelbuilder.com
How a 3D Printer Works
A traditional “2D” printer only prints left and right (the x-axis) & top and bottom (the y-axis) of a page of flat paper. A 3D printer has 3 Dimensions (hence the name): left/right (x-axis), forward/backward (y-axis), and up/down (z-axis). However, it doesn’t just print in a random order. A 3D printer prints things one layer at a time. This is necessary, so that the hot end (print head) does not touch any other taller parts of the model, which might potentially damage it. So it prints along a line on a single layer at a time, then moves up to the next layer, and continues following a predetermined path, which is set in the software you use to create the code the runs the print: gcode. The gcode tells the printer what path to take for each layer, optimizing it for fewer movements, to make the print as quick as it can.
By contrast, the software used to design the models is typically polygonal, meaning a series of flat shapes on a 3D plane, meshed together. Even a circle or sphere is a series of triangles, squares, or trapezoids, pieced together to make it seem rounded. There may be thousands of polygons in a single spherical shape, but luckily, the software does all the hard work! Converting to layers from polygons is the next step…
2. Save or Export as STL file
Each software will have its own way of doing this. Please read the appropriate Help Guide for your chosen software
3. Open STL file in printing software and save as GCODE
Converting STL to GCODE
The main difference between the TAZ and the Rostock 3D printers is the way they print. The mechanical process is different, and so the gcode files are created differently, and the code is different for the 2 printers, even with the exact same STL file. The Rostock uses MatterControl, while the TAZ uses Cura.
Otherwise, the 2 printers are mostly the same, except that the TAZ uses a thicker plastic filament.
In Cura (for TAZ):
- Be sure your “Machine” is set to the Lulzbot TAZ 5 (0.5 nozzle): Machine > Add New Machine > TAZ 4 or 5
- Click File > Load model file…
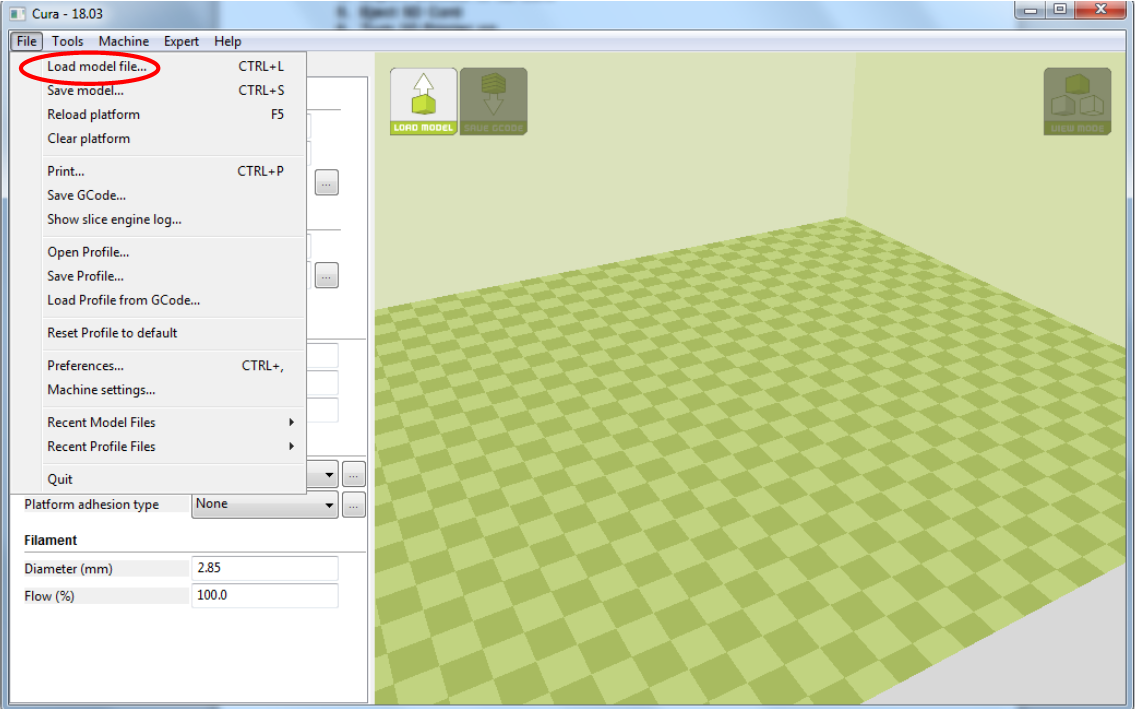
- Find and select your STL file, and click OK.
- Choose your print settings from the column on the left. The approximate amount of time it will take and how much filament will be needed is listed at the top-left of the preview window.
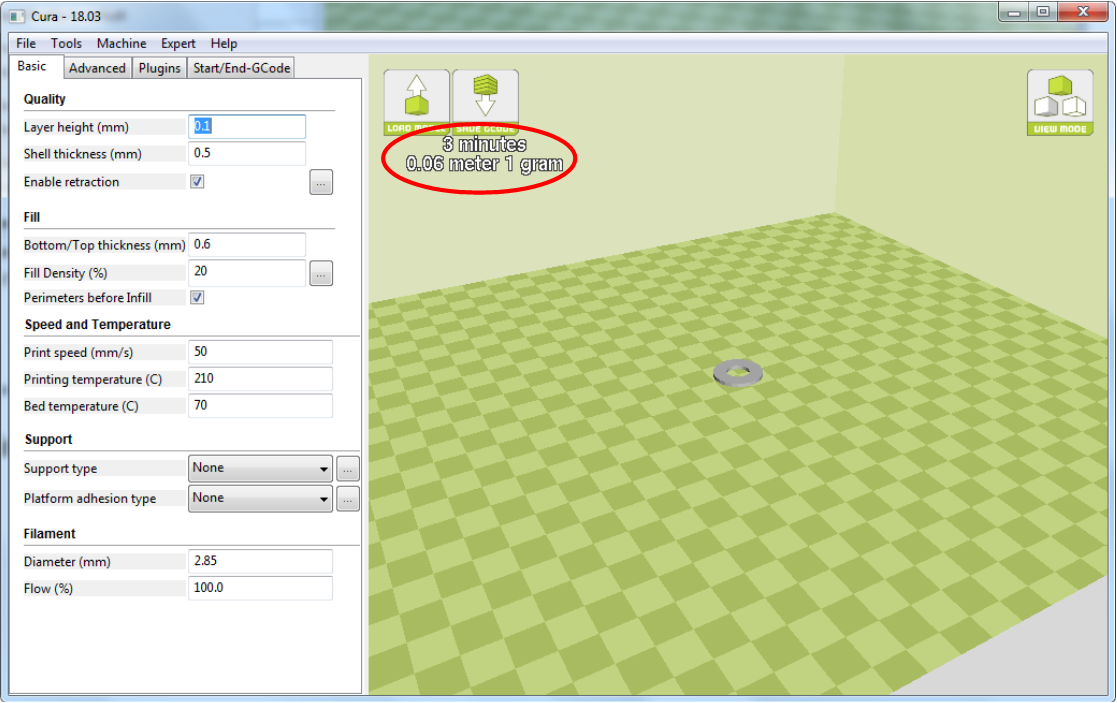
- When you are satisfied, press the SAVE GCODE button above the time display.

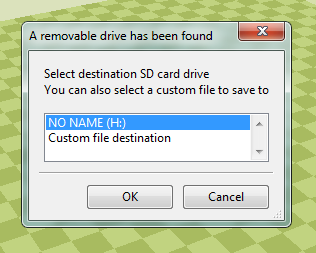
- Save your GCODE to your SD Card.
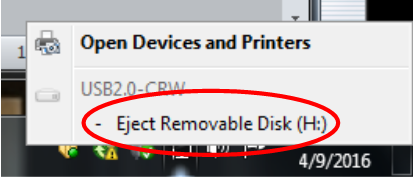
- Safely Eject SD Card for best results.
In MatterControl (for Rostock):
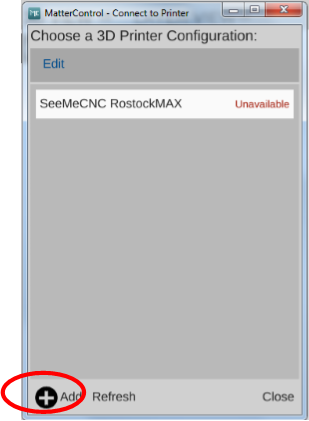
- Be sure your printer is selected (Rostock MAX v2): Select Printer > Add > Select Rostock Max > Save & Continue
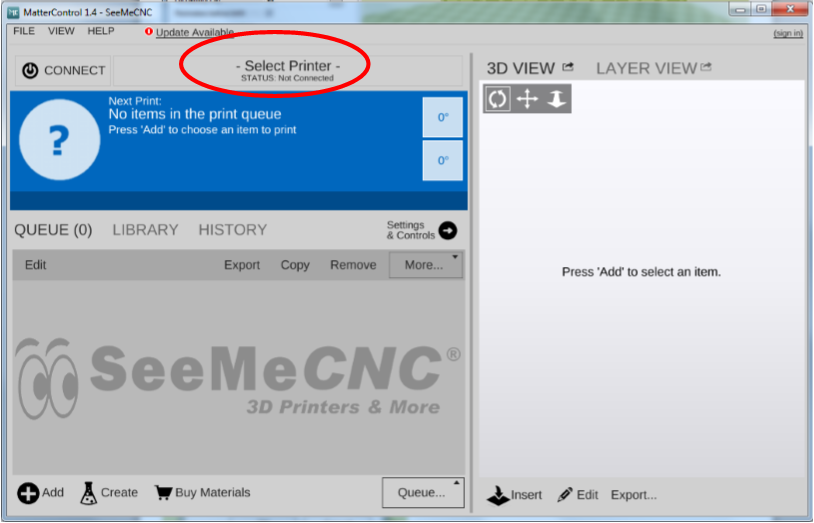
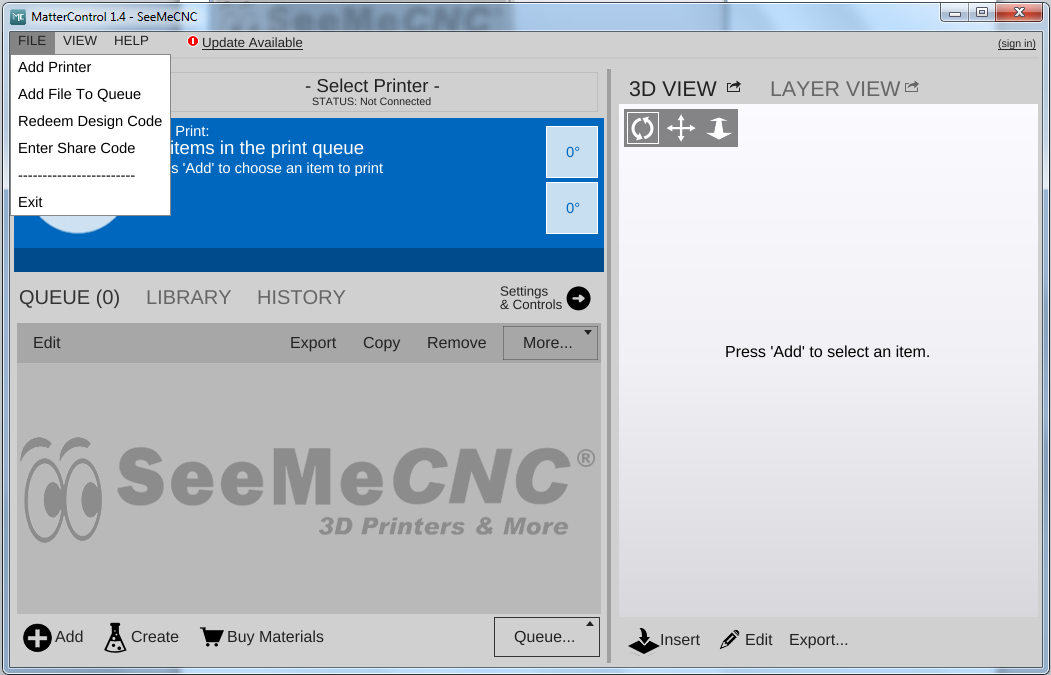
- Click File > Add File To Queue
- Select your STL file, and click Open.
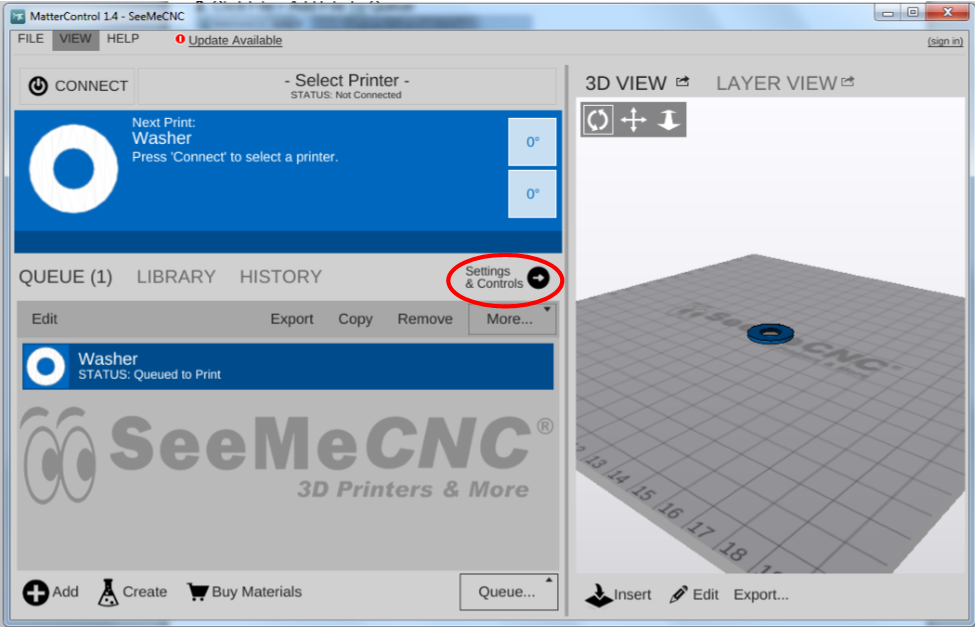
- Click Settings & Controls to change print settings. Be sure to hit Save before clicking Back.
- Click Layer View > Generate if you want to see how much time/filament you will need.
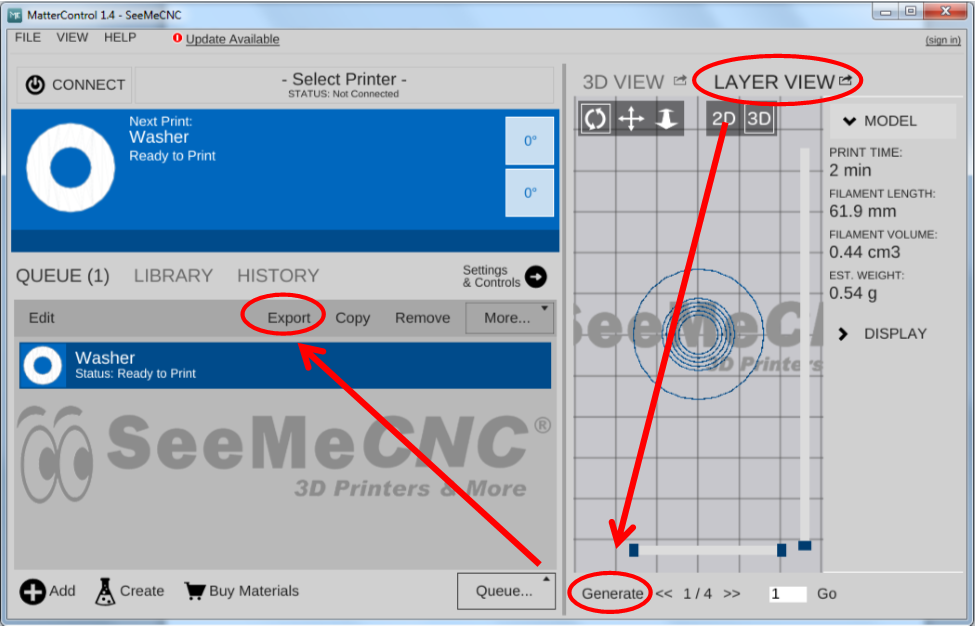
- Click Export > Export as GCode and choose your SD Card on the left column. Then click Save.
4. Print using your chosen 3D Printer
Printing Your GCODE
On the TAZ 5:
- Press the power switch on the Power Module, then on the TAZ.
- Wait ‘til the screen looks like this:

- Press the silver knob like a button. Then turn it to “Print from SD”.
- Press the button to select it, and choose your GCODE file.
- The TAZ will initialize and begin to preheat. This may take 5-10 mins.
- The TAZ will begin printing, and return to rest when finished, cooling down its hot end.
On the Rostock MAX v2:
- Press the power switch to turn the printer on.
- Wait ‘til the screen looks like this:
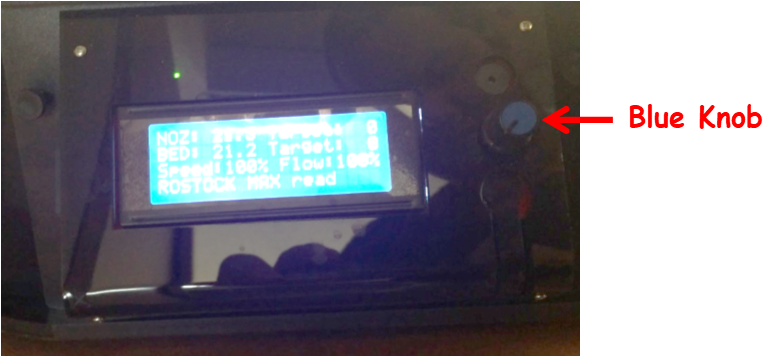
- Press the Blue Knob like a button. Then turn it to “Select File”.
- Press the button to select it, and choose your GCODE file.
- The Rostock will initialize and begin to preheat. This may take 5-10 mins.
- The Rostock will begin printing, and return to rest when finished, cooling down its hot end.
5. Watch for the first few minutes to ensure it starts okay
You want to be sure the object is printing properly, at the right size, and that the printer does not encounter any issues starting.
6. Wait
You must stay in the room during printing. Feel free to bring a book or other portable media with you.
Some Tips To Streamline Your Print Job
Preheating:
Start the 3D Printer BEFORE you convert the STL to GCODE. You can preheat the printer while you convert, and save a bit of time:
On the TAZ:
- Press the Silver Knob, and select “Temperature”
- Select PLA
On the Rostock:
- Press the Blue Knob, and select “Printer Settings”
- Select “Preheat PLA”
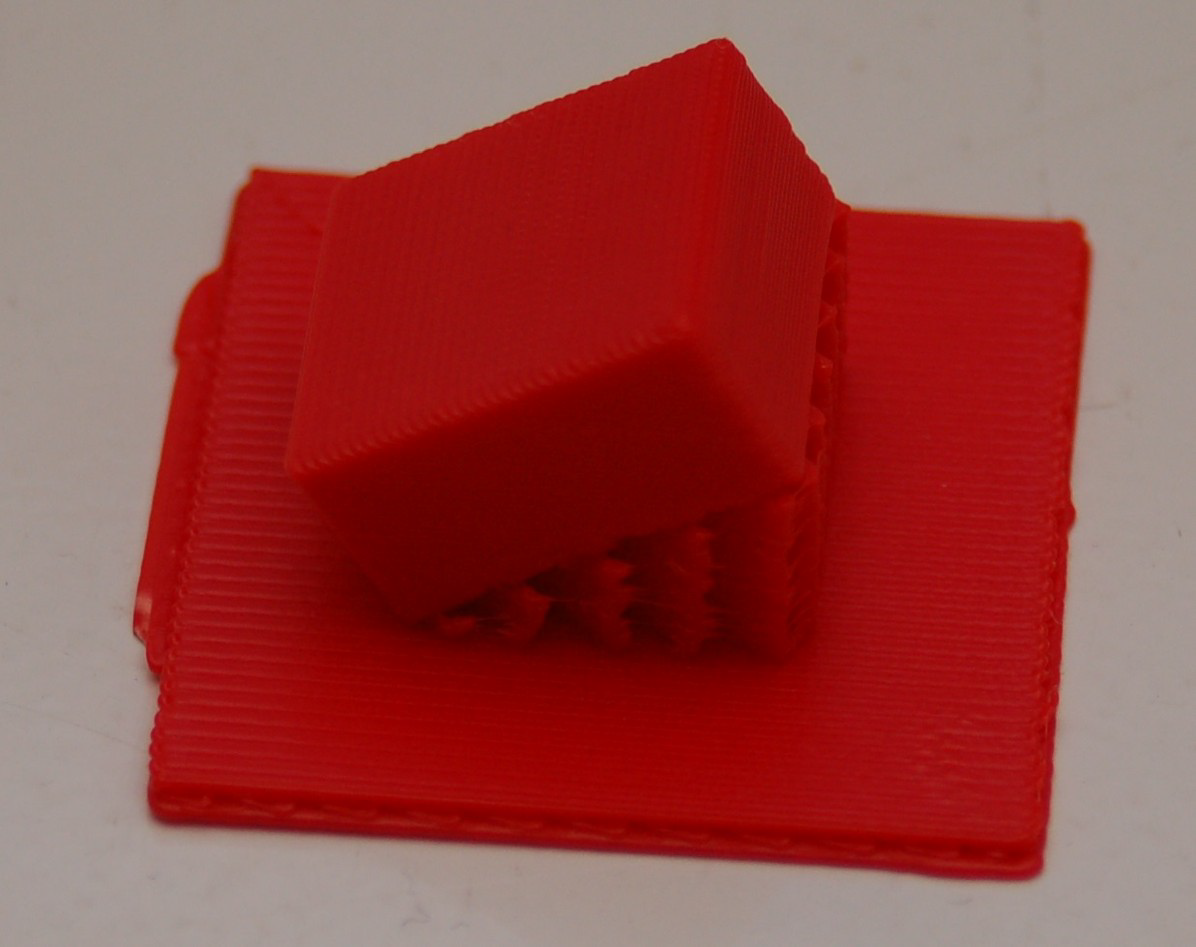
Support Material on a Raft supporting an Angled Cube
Support Material:
Because the 3D printer prints one layer at a time from the bottom up (and since it cannot print in midair), in some cases your model may need some “support”. If your 3D model has angles in it greater than or close to 45°, you may want to change the Print Settings to print support material as well. This will print extra “scaffolding” to support the areas of the model that overhang with no way to support it. This support material can be removed after the print, usually fairly easily, but may require some slight sanding after.
Raft:
The first few layers in a print are the most important, as they will determine the stability of the model. The PLA plastics used for printing stick to each other well, but not as well to the heated bed. If your 3D model has many parts that are not flat against the bed on the first layer, or if you are having trouble with the print not sticking well to the bed, you may want to print a “raft”, which is an initial layer or two of plastic directly beneath the model. This can be set in the Print Settings. The raft should break away easily after the print is completed.
Skirt:
When you first start printing, the plastic may not be pushed out of the hot end much yet, as it has just gotten heated up. The skirt is an outline around your model to get the plastic flowing well. This way, you can be sure it is primed for the print. We recommend a double skirt (2 skirts) for best results, and this setting can be set in the Print Settings. The distance of the skirt from the edge of the 3D model can be set. Setting it to 0 will put the skirt touching the edge of the model, which can provide stability for the model to help it stick to the bed better.
Choosing the Right Printer:
Each 3D Printer uses a different size filament, and while they both have the same size nozzle, the implications for printing change slightly depending on your needs.
The Rostock MAX can print finer edges. It still doesn’t do sharper angles, which may require some sanding, but it comes closer than the TAZ at producing finer lines and edges.
The TAZ prints models more bulkily, and can’t do finer edges. However, its prints end up being more solid and stable.
Also, due to the size of the print areas, the Rostock MAX is ideal for printing taller models, like statues, where the TAZ is better at wider areas where the model is not as tall as it is wide.
Scale:
Your model may not be as big (or small) as you think! Always check scale before printing or saving GCODE. The length of time may be a good way of telling how big it will be when printed.
About X, Y, and Z-axes:
Anyone who did calculus in high school likely remembers charting points on graph paper. You won’t need to be able to do that to make a 3D print, but knowing about the x, y and z axes can help you when creating or editing a 3D model. Keep in mind that all axes are correlated to an overhead view.
X-axis: correlates to left and right movement, or width. Negative values are left, and positive values are right.
Y-axis: correlates to forward and backward movement, or depth. Negative values are forwards (towards the front), and positive values are backwards.
Z-axis: correlates to up and down movement, or height. Negative values are down, and positive values are up.
So when you adjust a model on its X-axis in 3D editing software, you are adjusting its width. Adjusting on the Y-axis changes its depth, and adjusting on the Z-axis changes the height of the object.
A GCODE file is just a text file plotting the path the hot end takes when printing, using X & Y to move around in two dimensions on each layer (forward, backwards, left and right), and changing the Z-axis when it moves to the next layer. If you open the GCODE file in a text editor, you will see (among other things) X, Y, and Z coordinates, indicating the path the 3D printer should take.
It is important to note that each 3D printer may use a different system for printing.
For example, the TAZ prints by moving the bed on the Y-axis (forward & backwards), and moves the extruder/hot end left & right on the X-axis, and up & down on the Z-axis.
On the other hand, the Rostock printer is a type of 3D printer called a “delta”, that uses X, Y & Z axes to move each of its 3 arms up & down (positive and negative values on each axis), in order to maneuver the hot end around as it prints. It has to adjust ALL 3 axes in order to move in just one direction (up, down, left, right, forwards or backwards).
With this in mind, you can see why the GCODE for one 3D printer would NOT work on the other. X, Y, and Z have a different meaning on a delta 3D printer. So you need to make sure you use the software that is intended for the 3D printer you are going to use when you create your GCODE from the STL source file.
You must be logged in to post a comment.